skip to main |
skip to sidebar
 Remember when we graced you with the knowledge of how to add teaser posts to the new Blogger… No? Well here is how to add them to the classic Blogger templates.
 The following is how to create teaser posts for the classic blogger template, to create teaser posts for the new blogger click here.
First, from the blogger dashboard go to settings/archiving and enable post pages. Then follow the guide to adding expandable posts to the classic template here at the Blogger Help Center. Once you’ve done that you should have made three important changes to your blog.
1) You will have inserted this code:
<mainorarchivepage>
span.fullpost {display:none;}
</mainorarchivepage>
<itempage>
span.fullpost {display:inline;}
</itempage>
between your <style> tag and your </style> tag.
2) You will have inserted this code:
<MainOrArchivePage><br />
<a href="<$BlogItemPermalinkURL$>">Read more!</a>
</MainOrArchivePage>
after this line of code: <$BlogItemBody$>
3) Finally, you have gone to the settings section of the blogger dashboard. From here you have clicked on the formatting section and inserted the following code into the post template box:
Here is the beginning of my post. <span class="fullpost">And here is the rest of it.</span>
Note: I have just shat out this process for a detailed explanation of how to do it go to Blogger Help Center as mentioned above. Now let me quickly explain what everything does:
1) This creates a section in you post. With the addition of this section your posts now have two possible sections. The first section will show on your main page and the post page, the second section, however, will only be displayed on the post page.
2) You have added a read more link. This will appear at the end of every post on the main page and it takes you to the individual posts page when clicked allowing the viewer to see both sections of the post.
3) You have added code to your post template to make it easy for you to place your content in the relevant sections of your post. The first section is not marked by anything but everything you want to only show on the posts page must be in between the <span class="fullpost">tag and the </span> tag.
Now if you want to create teaser posts you will have to make changes to steps 1 and 3. To make a teaser post you are basically just adding a new section to your post, so after this you will have 3 sections in a post instead of 2.
To add the new section insert this code above the code you inserted in step 1:
<mainorarchivepage> span.teaser {display:inline;} </mainorarchivepage> <itempage> span.teaser {display:none;} </itempage>
Then in your dashboard/settings/formatting section replace the previous code in your post template box with this:
<span class="teaser">Insert teaser here.</span><span class="fullpost">Insert body of post here.</span>
Now your posts have the following three sections:
1) Teaser section: Anything between the <span class="teaser">tag and </span>tag will only appear on the main page and not on the post page.
2) Normal section: Anything that is not between span class tags will appear on both pages.
3) Post section: Anything between the <span class="fullpost">tag and </span>tag will only appear on the post page.
This obviously opens up your formatting to far more than just the basic teaser setup we’ve been using. So have fun experimenting with all the different combinations. Also it can be a bit tricky at first to format these successfully and you can basically forget about your blogger preview as being a useful reference point. My best piece of advice for formatting is make sure there are no spaces before and after span tags.
Read It...
 Blogger hacks aren’t our normal topic of conversation but since one of our own came up with this all by himself we’ll make an exception. If you want pretty little teasers on your blog to entice your audience read on.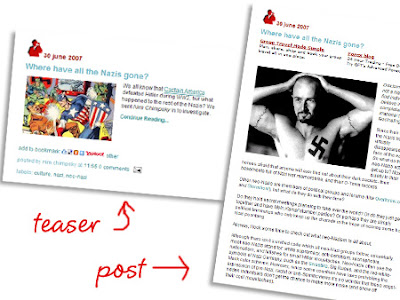
Maybe you’ve notice over the last few days that all the posts on our main pages have been getting converted into teasers. If not check it out quickly. You’ll notice that most of the time the content in the teaser is different from the content on the main post page. That’s because I’ve discovered a new blogger hack which I’m calling teaser posts. It is basically a modification of the expandable post option with the following advantages:
1) You can have a unique introduction in the teaser and the post as opposed to the main page having the regular introduction.
2) You can have different pictures or different sized pictures on the main page and the post page.
If you would like to do this carry on reading.
First, from the blogger dashboard go to settings/archiving and enable post pages. Then follow the guide to adding expandable posts here at Beta Blogger for Dummies. Once you’ve done that you should have made three important changes to your blog.
1) You will have inserted this code:
<style>
<b:if cond='data:blog.pageType == "item"'>
span.fullpost {display:inline;}
<b:else/>
span.fullpost {display:none;}
</b:if>
</style>
between your </head> tag and your ]]></b:skin> tag.
2) You will have inserted this code:
<b:if cond='data:blog.pageType != "item"'>
<a expr:href='data:post.url'>Read more!</a>
</b:if>
after this line of code: <data:post.body/>
3) Finally, you have gone to the settings section of the blogger dashboard. From here you have clicked on the formatting section and inserted the following code into the post template box:
Here is the beginning of my post. <span class="fullpost">And here is the rest of it.</span>
Note: I have just shat out this process for a detailed explanation of how to do it go to Beta Blogger for Dummies as mentioned above. Now let me quickly explain what everything does:
1) This creates a section in you post. With the addition of this section your posts now have two possible sections. The first section will show on your main page and the post page, the second section, however, will only be displayed on the post page.
2) You have added a read more link. This will appear at the end of every post on the main page and it takes you to the individual posts page when clicked allowing the viewer to see both sections of the post.
3) You have added code to your post template to make it easy for you to place your content in the relevant sections of your post. The first section is not marked by anything but everything you want to only show on the posts page must be in between the <span class="fullpost">tag and the </span> tag.
Now if you want to create teaser posts you will have to make changes to steps 1 and 3. To make a teaser post you are basically just adding a new section to your post, so after this you will have 3 sections in a post instead of 2.
To add the new section insert this code above the code you inserted in step 1:
<style>
<b:if cond='data:blog.pageType == "item"'>
span.teaser {display:none;}
<b:else/>
span.teaser {display:inline;}
</b:if>
</style>
Then in your dashboard/settings/formatting section replace the previous code in your post template box with this:
<span class="teaser">Insert teaser here.</span><span class="fullpost">Insert body of post here.</span>
Now your posts have the following three sections:
1) Teaser section: Anything between the <span class="teaser">tag and </span>tag will only appear on the main page and not on the post page.
2) Normal section: Anything that is not between span class tags will appear on both pages.
3) Post section: Anything between the <span class="fullpost">tag and </span>tag will only appear on the post page.
This obviously opens up your formatting to far more than just the basic teaser setup we’ve been using. So have fun experimenting with all the different combinations. Also it can be a bit tricky at first to format these successfully and you can basically forget about your blogger preview as being a useful reference point. My best piece of advice for formatting is make sure there are no spaces before and after span tags.
Read It...


 The following is how to create teaser posts for the classic blogger template, to create teaser posts for the new blogger click here.