How to Add Post Teasers to Beta Blogger

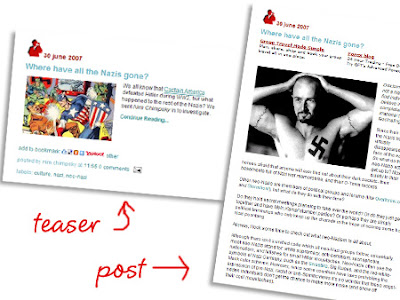
Maybe you’ve notice over the last few days that all the posts on our main pages have been getting converted into teasers. If not check it out quickly. You’ll notice that most of the time the content in the teaser is different from the content on the main post page. That’s because I’ve discovered a new blogger hack which I’m calling teaser posts. It is basically a modification of the expandable post option with the following advantages:
1) You can have a unique introduction in the teaser and the post as opposed to the main page having the regular introduction.
2) You can have different pictures or different sized pictures on the main page and the post page.
If you would like to do this carry on reading.
First, from the blogger dashboard go to settings/archiving and enable post pages. Then follow the guide to adding expandable posts here at Beta Blogger for Dummies. Once you’ve done that you should have made three important changes to your blog.
1) You will have inserted this code:
<style>
<b:if cond='data:blog.pageType == "item"'>
span.fullpost {display:inline;}
<b:else/>
span.fullpost {display:none;}
</b:if>
</style>
between your </head> tag and your ]]></b:skin> tag.
2) You will have inserted this code:
<b:if cond='data:blog.pageType != "item"'>
<a expr:href='data:post.url'>Read more!</a>
</b:if>
after this line of code: <data:post.body/>
3) Finally, you have gone to the settings section of the blogger dashboard. From here you have clicked on the formatting section and inserted the following code into the post template box:
Here is the beginning of my post. <span class="fullpost">And here is the rest of it.</span>
Note: I have just shat out this process for a detailed explanation of how to do it go to Beta Blogger for Dummies as mentioned above. Now let me quickly explain what everything does:
1) This creates a section in you post. With the addition of this section your posts now have two possible sections. The first section will show on your main page and the post page, the second section, however, will only be displayed on the post page.
2) You have added a read more link. This will appear at the end of every post on the main page and it takes you to the individual posts page when clicked allowing the viewer to see both sections of the post.
3) You have added code to your post template to make it easy for you to place your content in the relevant sections of your post. The first section is not marked by anything but everything you want to only show on the posts page must be in between the <span class="fullpost">tag and the </span> tag.
Now if you want to create teaser posts you will have to make changes to steps 1 and 3. To make a teaser post you are basically just adding a new section to your post, so after this you will have 3 sections in a post instead of 2.
To add the new section insert this code above the code you inserted in step 1:
<style>
<b:if cond='data:blog.pageType == "item"'>
span.teaser {display:none;}
<b:else/>
span.teaser {display:inline;}
</b:if>
</style>
Then in your dashboard/settings/formatting section replace the previous code in your post template box with this:
<span class="teaser">Insert teaser here.</span><span class="fullpost">Insert body of post here.</span>
Now your posts have the following three sections:
1) Teaser section: Anything between the <span class="teaser">tag and </span>tag will only appear on the main page and not on the post page.
2) Normal section: Anything that is not between span class tags will appear on both pages.
3) Post section: Anything between the <span class="fullpost">tag and </span>tag will only appear on the post page.
This obviously opens up your formatting to far more than just the basic teaser setup we’ve been using. So have fun experimenting with all the different combinations. Also it can be a bit tricky at first to format these successfully and you can basically forget about your blogger preview as being a useful reference point. My best piece of advice for formatting is make sure there are no spaces before and after span tags.


11 comments:
Hi, thanks a lot for replying my question on Blogger help.
I tried doing what you've written in this post, but it isn't working. First of all, my template is the classic one, which doesn't have statements like ]]>< /b:skin> and < data:post.body/>
Anyway, I placed the code just above the < /head> tag and just below what I thought was the 'post body'. Then I placed the span tags in the post.
When I published it, the 'Read More' link appeared in place, but
1) The whole post appeared, It wasn't a teaser.
2) The read more link was invalid, it didn't work at all
Please help!
Hi Ashwita
This post was written for the new blogger, so I'm not sure about how it would work on beta blogger.
The fact that you have the read more link appearing is a good sign. I'm going to look into it further soon to fix your problems.
Just to make sure you have reformatted all your posts with the
span class="teaser" and span class="fullpost" tags right.
Anyway I'll do my research and I should have a classic blogger version of this up soon. But he current template you're using is on the new blogger and it shouldn't be too much of an effort to upgrade. I'd seriously consider it.
Hi,
Your Teaser is great and works fine..thanks a lot
i wud like place my ads between posts like u have done.. Can u help
plz reply me at pratikbhopal@gmail.com
Sure Pratik, not a problem, I'll email you later today. Also what is the address of your blog?
Wow. Interesting.
Do you know if this works if you post the teaser on a site that is NOT hosted by Blogger?
Also, do you know if users can syndicate teasers for ONLY the most recent post (as opposed to displaying mult. teasers)?
I ask because it would be great to only feature 1 teaser on the front page of my URL (which is not hosted by Blogger).
Thanks!
Mr. Mortified this will work as long as your template is using the new blogger interface instead of the classic one. If you are using classic blogger there is a post on this blog about adding teaser posts to that.
There is no automatic way to make teasers work for only the most recent posts, however, a post will only take on the teaser format when you use the relevant span tags. So you could make your newest post a teaser post and then remove the span tags from the previous new post to make it normal again.
Also if you are going to have some posts as teasers and others that are not you should read our post title "Do you want smarter posts", which tells you how to make your posts automatically add or remove a read more link depending on what the post calls for.
hey.. nice one mate!
but one question though.. so the code works for me yea. but the thing is in every post that i have, the link "READ MORE" is always present..so even if i dont need it it wud still show up..
any tips on how to like turn on or off this feature?..
Hey Rey, the answer to your question is actually in the comment above yours but I'll paste the hyperlink to save you time:
Smarter Posts
The article that tells you how to do it is in Spanish, so make sure to have Google translator ready. If you have problems let me know.
oh my bad.. ok thanx for the quick reply..
ill check on the link u gave me.. and ill shoutout when things go crazy..
thanx mate!
*big cheers from down under*
wow thanks!
it really helped me on my blog!
I think all this came with the use of template. My problem is that in the main page the formating for the text has gone and i need some help on how to keep the same formating in both teaser and main page
thanks
Post a Comment